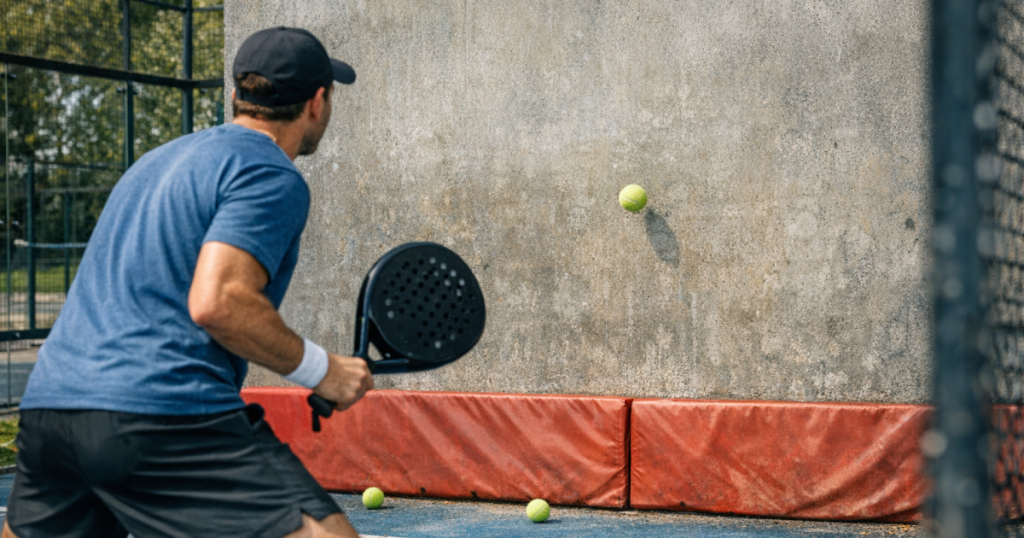
A wall session can be one of the easiest ways to get more touches between club games. If you want to practise padel against a wall, the key is to keep the space controlled, the swing compact and the goal simple.
Used well, a wall helps beginners build rhythm, cleaner contact and better footwork without needing a partner. Used badly, it can turn into rushed hitting, awkward rebounds and habits that do not transfer well to a real padel court.
What to know first
- Choose a flat, sturdy wall with enough clear space behind and beside you.
- Use low-to-medium pace rather than trying to hit hard.
- Practise compact forehands, backhands, volleys and simple movement patterns.
- Avoid glass, windows, parked cars, people, loose gravel and uneven ground.
- Stop the drill as soon as your timing breaks down; quality matters more than total hits.
Pick a safe wall and playing area
Before you hit a ball, look at the wall and the ground as if you were setting up a mini training zone. The safest option is a solid, flat wall with a smooth surface and no breakable panels. A sports hall wall, a dedicated rebound wall, or a permitted outdoor practice wall is much better than a random wall near a path or car park.
You need enough room for the ball to rebound, for you to move, and for a mishit to stay harmless. As a simple beginner check, leave at least 3 metres between you and the wall for groundstroke drills, and more if the ball is coming back quickly. You also want clear space to your left and right so you can step into the shot without twisting or clipping something with your racket.
Check the floor too. Wet tarmac, loose stones, mossy paving and sloped concrete all make it harder to push off and stop safely. If the ground is slippery, uneven or crowded, do not try to make the session work. A shorter, safer practice in a better spot is far more useful than 30 minutes of cautious, off-balance hitting.
Set your body up before the first ball
Wall practice should feel like a controlled padel warm-up, not a fitness test. Start with a few minutes of gentle movement: ankle circles, side steps, light jogging on the spot, shoulder rolls and small practice swings. You are preparing your feet, knees, hips and shoulders for repeat movements.
Wear footwear that grips the surface you are using. On a court, padel shoes are designed for lateral movement and quick stops. On an outdoor public surface, make sure your soles are clean and not worn smooth. If you are still working out what proper padel footwear gives you, this beginner padel shoe comparison explains the kind of support and grip new players should think about.
Keep your racket grip relaxed. Beginners often squeeze too hard during solo drills because the ball keeps coming back quickly. That tension makes your swing jerky and can tire your forearm. Aim for a calm ready position: racket in front, knees slightly bent, feet active and eyes on the ball.
Start with control, not power
The biggest wall-practice mistake is hitting too hard too soon. A padel court rewards control, angles and decision-making more than raw force, so your wall drills should do the same. If every rebound is forcing you to lunge, chase or swing late, the drill is too fast.
Begin close to the wall with a soft tap. Let the ball rebound, move your feet, and send it back with a short swing. Your first target is not a long rally; it is clean contact in front of your body. Once you can repeat that calmly, move slightly farther back or add a little pace.
It helps to give the ball a clear height target. Imagine a band on the wall around net height and another around shoulder height. For most beginner groundstroke drills, aim to keep the ball comfortably above the imagined net but not so high that it loops wildly back at you. The exact height matters less than building a repeatable, tidy ball flight.
Drill 1: gentle forehand rhythm
Stand roughly 3 metres from the wall. Drop the ball, let it bounce, then play a compact forehand into the wall. As it rebounds, let it bounce once, adjust your feet and play again. Keep the swing short, with your racket finishing naturally rather than wrapping dramatically across your body.
Do this in sets of 10 controlled contacts. If you miss, reset rather than snatching at the next ball. The aim is to teach your body that a forehand starts with positioning: small steps first, swing second. When 10 feels easy, try 15 or 20, but keep the pace modest.
Drill 2: backhand balance check
The backhand is where many new players lean back or reach across the body. Wall practice can help, as long as you slow it down. Start with a ball drop and play a soft backhand to the wall, allowing one bounce before each return.
Focus on staying balanced through contact. Your head should not be falling away from the ball, and your feet should not be stuck in one line. If the ball keeps jamming you, step a little farther back. If it keeps dying short, move closer and use a smoother follow-through.
For two-handed backhands, keep both hands connected and avoid a big tennis-style swing. For one-handed backhands, prioritise a firm wrist and a simple path through the ball. Either way, your goal is steady contact, not a highlight shot.
Drill 3: short volley reactions
Move closer to the wall, around 1.5 to 2 metres away, and use very soft contact. Volley drills are excellent for hand-eye coordination, but they can become unsafe if you blast the ball and give yourself no reaction time.
Hold the racket in front of your chest and punch the ball gently into the wall. Keep the face stable and the movement small. Alternate forehand volley and backhand volley if you can, but do not rush the change. If the ball rebounds too quickly, soften the hit or step back slightly.
A good volley wall drill feels neat and quiet. You should hear controlled taps, not desperate slaps. Stop after 20 to 30 seconds, reset your posture, then go again. Short sets keep your technique sharper.
Drill 4: movement after every shot
Padel is not played from a fixed spot, so add simple footwork once your basic contact is stable. Hit a forehand to the wall, recover to a central ready position, then hit the next ball. Do the same with the backhand. The recovery step is the important part.
A useful pattern is: hit, small split step, adjust, hit again. This teaches you not to admire the shot. It also makes wall practice feel closer to a rally, where every ball requires a reset before the next decision.
If you later practise with a partner, you can connect this habit to communication. Calling early, recovering together and choosing the right ball are all easier when your feet are active. These partner call-out drills are a good next step once you move from solo work back onto court.
Keep your swing padel-shaped
A wall can accidentally encourage long swings because there is no opponent punishing you for being late. Try to keep your technique close to what you want in club play. Use compact preparation, contact in front, a stable racket face and a controlled finish.
Be careful with big topspin swings, wild slices and hard smashes. They may feel satisfying against a wall, but they often make beginners mistime the ball in a real game. Padel rewards using the glass, controlling the pace and staying ready for the next shot. Your wall session should support those habits, not pull you away from them.
For overhead practice, be especially cautious. A wall is not the best place to learn aggressive smashes because the rebound can come back at awkward angles. If you want to work on overhead rhythm, use gentle self-feeds, soft contact and plenty of space. For a more court-like progression, use easy bandeja feed drills when you have access to a suitable court or partner.
Use simple targets
Targets make wall practice more focused. You do not need equipment; visual markers are enough. Pick a brick, a scuff mark, or an imaginary rectangle on the wall. Aim for that area for 10 shots, then change the target slightly.
For groundstrokes, use a target that encourages a steady rebound rather than a low skid. For volleys, choose a target closer to chest height and reduce the pace. For footwork drills, set a starting point on the ground and return to it after every shot.
If you use cones or a spare towel to mark your feet, place them well away from your landing area so they do not become a trip hazard. The marker should guide you, not clutter the practice space.
Know when to stop or change the drill
Good solo practice has a clear end point. Stop a drill when your contact gets rushed, your shoulder tightens, or you start chasing the ball into unsafe positions. Beginners often get more from five clean sets than from one long, messy rally.
Use this quick check every few minutes:
- Can I still move calmly before the ball arrives?
- Am I hitting at a pace I could control on court?
- Is the ball staying in my safe practice area?
- Are my feet gripping properly?
- Am I repeating a useful shot shape, or just reacting?
If two or more answers are negative, pause and reset. Move closer, reduce the speed, switch to ball drops, or finish the session.
A simple 20-minute wall session
Here is an easy structure for a beginner who wants useful practice without overdoing it:
- 3 minutes: warm-up with side steps, shoulder rolls and gentle shadow swings.
- 4 minutes: soft forehand rhythm, using one bounce between shots.
- 4 minutes: soft backhand rhythm, resetting after every miss.
- 3 minutes: short volley taps, in short 20 to 30 second sets.
- 4 minutes: forehand and backhand with recovery steps after each shot.
- 2 minutes: cool down with light movement and relaxed stretching.
Keep the whole session at a conversational effort level. You should finish feeling sharper, not battered. If you are new to padel, two or three short wall sessions a week alongside club play is usually more productive than one exhausting solo grind.
Common mistakes to avoid
- Standing too close: you give yourself no time to react and end up blocking awkwardly.
- Hitting too hard: the drill becomes survival rather than skill practice.
- Using a poor surface: slippery or uneven ground changes your movement and increases the chance of a stumble.
- Ignoring the rebound angle: if the ball shoots off unpredictably, the wall may not be suitable.
- Practising only your favourite shot: mix forehand, backhand, volleys and footwork so the session transfers better to games.
Things readers ask
Can I use a tennis ball against a wall for padel practice?
You can use one for very gentle coordination work, but it will not feel the same as a padel ball. For better timing, use a proper padel ball when the space is safe and suitable.
How far should I stand from the wall?
For beginner groundstrokes, start around 3 metres away. For soft volleys, move closer, around 1.5 to 2 metres, but reduce the pace so the rebound stays manageable.
Is wall practice enough to improve my padel?
It helps with contact, rhythm and footwork, but it cannot replace court positioning, glass play, teamwork or decision-making. Treat it as extra practice between real games.
Should I practise smashes against a wall?
Not as a beginner. Smashes can rebound sharply and encourage poor habits. Start with controlled overhead feeds and learn attacking shots in a proper court setting.
How long should a beginner wall session be?
About 15 to 25 minutes is enough for most new players. Stop earlier if the surface feels unsafe, your timing drops, or you start hitting harder just to keep the rally alive.
Main lessons
The safest way to practise padel against a wall is to keep everything controlled: safe surface, clear space, compact swing and sensible pace. Build from soft contact to simple movement, then stop before tired technique takes over.
Wall drills are not about proving how long you can keep the ball going. They are about making your next club session feel calmer: cleaner first contact, better balance, quicker recovery and more confidence when the ball comes back at you.